Grounding Priorities for Custom Rackmount Enclosures
- Grounding features belong in the DFM review so the enclosure is built with them, which reduces compliance risk and rework.
- Painted surfaces break conductive paths, so drawings must call out paint-scrub zones, busbar provisions and jumper points before cutting.
- Each fabrication step, from requirements through continuity checks, needs documented outputs, cross-functional review and clear decision points.
- Hardware such as star washers, serrated fasteners and braided straps, combined with masking and torque records, protects grounding on steel and aluminum.
- Partnering with an integrated U.S. fabricator like Fabcon embeds grounding expertise into DFM and supports code-compliant rackmount enclosures on compressed timelines.
Why Grounding Fails on Painted Rackmount Enclosures
Standard server-rack guidance assumes bare metal contact at every joint. Custom painted enclosures introduce variables that break that assumption.
Powder coat and wet paint act as insulators. A painted mating surface between a panel and chassis rail interrupts the conductive path regardless of fastener torque. Hinges on removable doors create intermittent contact points that degrade under vibration and thermal cycling. Gland plates and cable entry panels, when painted on both faces, offer no reliable bonding surface without deliberate preparation.
Poor grounding can result in voltage fluctuations, crosstalk or complete device failure, which directly links grounding quality to equipment reliability. Late-discovered EMC issues are expensive to fix, so grounding design belongs at the start of the process.
The root cause of most failures on custom painted enclosures is not a missing ground wire. The absence of fabricated bonding features such as paint-scrub zones, captive hardware pockets and dedicated jumper attachment points usually traces back to drawings that lacked those details before the first laser cut.
Step-by-Step Grounding Process for Custom Enclosures
Step 1: Define Electrical and Mechanical Grounding Requirements
The engineering team documents the grounding requirements before releasing any drawing to the floor. This document lists applicable standards such as TIA, BICSI, IEC, NEC Article 250 and relevant IEEE guidelines, along with the required resistance threshold.
Many data center and telecom programs specify a tight threshold at individual bond points. The output of this step is a grounding requirements document that feeds directly into the DFM review.
Decision point: The team confirms whether the enclosure will carry safety ground only, functional EMI ground or both. Each choice drives different hardware and routing requirements.
Step 2: Call Out Grounding Features During DFM Review
The DFM review is the stage where every grounding feature is specified. The fabricator engineering team reviews drawings for paint-scrub zone locations, busbar mounting provisions, jumper attachment points and hardware callouts. Features identified here move into the manufacturing router and work instructions before production begins.
Cross-functional review at this stage includes mechanical engineering, electrical engineering, the fabrication floor lead and the finishing team. Among these participants, the finishing team plays a central role because it controls masking and coating, so it confirms which surfaces will be masked, which will receive full coating and where bare-metal contact is required for bonding.
Output: Revised drawings with grounding features called out, an updated BOM with bonding hardware and work instructions that sequence masking before coating.
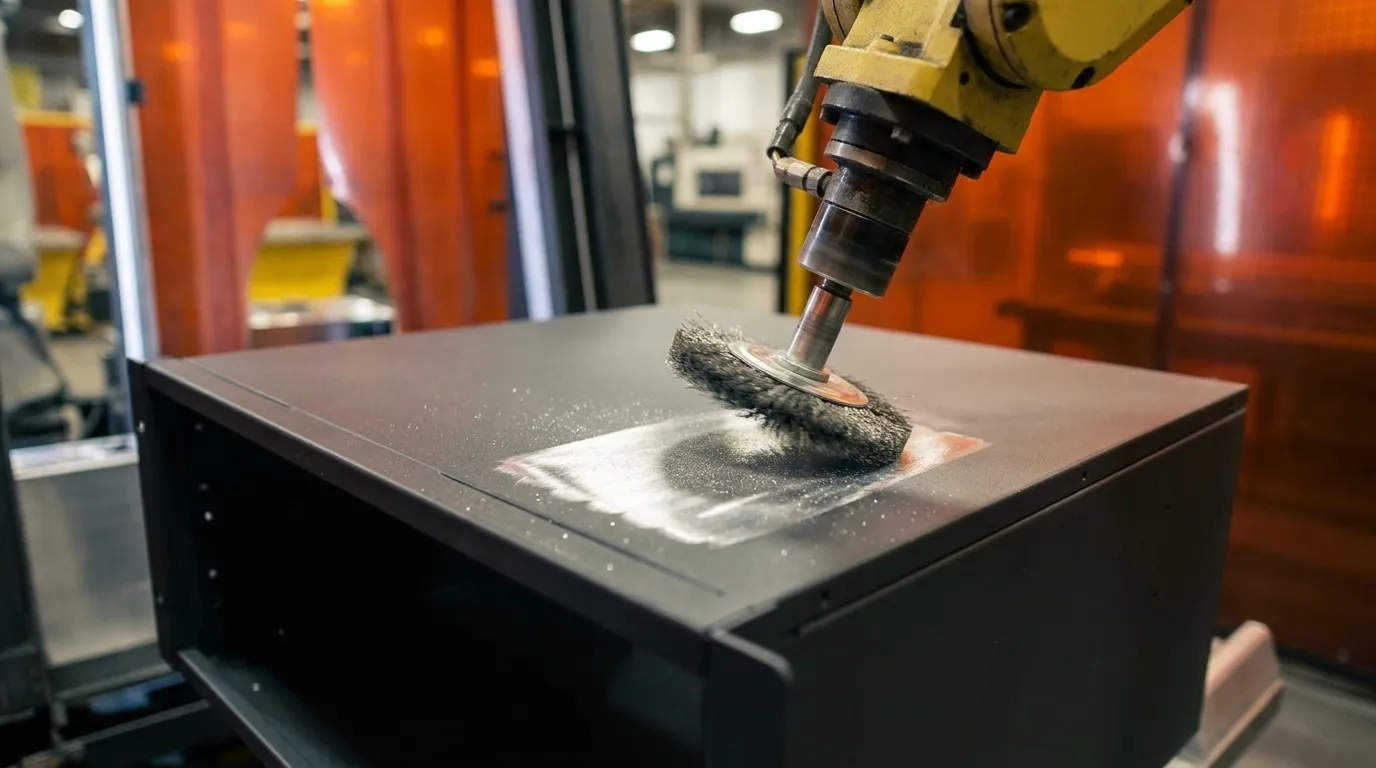
Step 3: Fabricate Paint-Scrub Zones and Mounting Points
Paint-scrub zones preserve bare metal at bonding locations through masking during finishing. On steel enclosures, these zones sit at busbar mounting pads, door hinge attachment points and removable panel mating flanges. On aluminum enclosures, bare zones require additional attention because aluminum oxidizes rapidly, so the non-conductive oxide layer must be removed immediately before hardware installation.
Corrosion often begins where coatings are damaged, dissimilar metals meet or cut edges are left unprotected. Designers specify corrosion-appropriate alloys and avoid mixed-metal hardware in aggressive environments to protect long-term grounding integrity.
Output: A fabricated chassis with masked bonding zones, threaded inserts or weld nuts installed at busbar mounting locations and dimensional inspection records confirming hole pattern accuracy.
Step 4: Install Copper Busbar and Dedicated Jumpers
Bonding intentionally creates low-impedance connections between metallic components so all parts remain at the same electric potential, per NEC Article 250. Copper busbars provide the primary bonding rail. Dedicated jumpers connect removable doors, panels and subassemblies back to the busbar.
Ground connections should be tightly fastened using thimbles and nut-and-bolt terminations, with continuity testing performed afterward to verify the grounding path. Grease applied around joints protects against corrosion at terminations.
Output: An installed busbar with torque records, jumper routing documented in work instructions and a pretest visual inspection signoff.
Step 5: Verify Grounding Continuity
Continuity testing uses a calibrated low-resistance ohmmeter or milliohmmeter. Test points include each removable panel, door and subassembly relative to the main chassis ground stud.
A conservative pass criterion satisfies most data center and telecom requirements. Failures at this stage usually trace back to incomplete paint removal at a bonding zone, a missing or under-torqued jumper or a hardware substitution that introduced a non-conductive coating.
Output: A completed continuity test record, signed by the assembler and QA inspector and filed against the serial number in the QMS.
Chassis Bonding Hardware and Connection Methods
Hardware selection at bonding joints determines whether the electrical path survives assembly, shipping and field service. Star washers and serrated-flange fasteners provide a standard mechanical solution for painted or anodized surfaces. Their teeth cut through the coating under torque and create metal-to-metal contact at the fastener perimeter.
Steel enclosures accept standard zinc-plated star washers at most bonding points. Aluminum enclosures require stainless steel or aluminum-compatible hardware to prevent galvanic corrosion. Mixed-metal hardware in aluminum assemblies accelerates corrosion at the bond point and degrades resistance over time.
For removable doors and panels, braided bonding straps or coiled jumper cables provide a flexible, low-impedance path that tolerates repeated open-close cycles. Strap attachment points must land on fabricated bare-metal pads, not on painted surfaces, regardless of fastener type.
A conductive enclosure acts as a Faraday cage only when cable shields have 360-degree termination to the enclosure exterior, which maintains cage continuity and contains internal emissions while blocking external interference.
Grounding Checklists, PFMEA and Example Layouts
The grounding sequence involves multiple handoffs between engineering, fabrication and finishing teams. A DFM grounding checklist keeps features from being lost at these transitions by defining a gate before first article. The checklist confirms that paint-scrub zones appear on drawings, busbar mounting provisions sit in the BOM, jumper routing is documented in work instructions and continuity test criteria are defined.
Process failure mode and effects analysis, or PFMEA, applied to the grounding sequence identifies high-risk steps such as the masking-before-coating handoff and the jumper installation step. The team assigns control measures before production begins. Stage-gate NPI reviews at DFM, first article and production release provide checkpoints where grounding compliance is verified against the requirements document from Step 1.
One busbar placement example uses a chassis with a full-width copper busbar mounted at the rear rail. Individual jumpers route to the front door through a coiled strap at the hinge, to the side panels through serrated fasteners at masked pads and to the cable entry gland plate through a short braided strap. Every attachment point is a fabricated feature, not a field modification.
Common Grounding Challenges and Troubleshooting Steps
Incomplete drawings create the most common first-article grounding failures. When bonding zone locations, hardware callouts and jumper routing are absent from released drawings, the fabricator makes assumptions that rarely match the electrical engineer intent.
Late design changes introduce a related risk. A panel added after DFM review may lack a bonding provision. A door hinge relocated for aesthetic reasons may no longer align with the jumper attachment point. Change control processes include a grounding impact review as a mandatory step.
Underestimated test requirements create schedule risk at first article. Programs that specify continuity testing for the first time at the first-article stage often discover that test point access is blocked by installed hardware or that the test instrument requires a ground stud that the BOM omitted.
A shield grounded with a 20 mm pigtail can erase the performance advantage promised by IEC 61000 test data, and pigtail terminations introduce significant inductance that can render shielding nearly ineffective above a few MHz. Reviewing grounding geometry during DFM prevents these failure modes before EMC precompliance testing.
Measuring Grounding Performance and Program Health
First-pass yield on continuity testing serves as the primary early indicator of grounding process quality. A high first-pass yield at the 0.5 ohm threshold confirms that DFM callouts, masking procedures and assembly work instructions align. Failures at this stage are tracked by root cause and fed back into the PFMEA.
On-time delivery and defect rates at the program level reflect the downstream benefit of early grounding integration. Programs that resolve grounding requirements during DFM avoid the schedule impact of first-article rework and the cost of post-build retrofits.
Supplier metrics for programs using an integrated fabrication and assembly partner track the number of vendor handoffs in the grounding sequence. A single partner managing fabrication, finishing and assembly eliminates the coordination gaps where grounding features are most often lost or misinterpreted.
Long-term indicators include field return rates tied to grounding failures and EMC compliance pass rates at certification. These metrics validate the investment in early DFM integration and provide data for continuous improvement across program generations.
Advanced Grounding Strategies and Iteration
High-mix programs with multiple enclosure SKUs benefit from a standardized grounding feature library. This library contains preapproved busbar mounting provisions, paint-scrub zone geometries and jumper attachment configurations that apply across the product family. The library reduces DFM review time for new SKUs and supports consistency across the program.
Controlled pilot builds provide a practical approach for introducing a new grounding architecture. A pilot of representative units, built to the full production router and tested to the full continuity specification, surfaces process gaps before volume production begins. Pilot results feed directly into work instruction updates and PFMEA revisions.
Supplier integration at the design stage shortens the iteration cycle. The fabricator engineering team participates in DFM review alongside the OEM mechanical and electrical engineers. NEC and IEEE rules require frames of generators, stationary motors and metallic parts of transformers to be earthed by two separate and distinct connections. Applying this principle to custom enclosures during design review, rather than at installation, prevents compliance gaps that cost more to address after fabrication.
Frequently Asked Questions
When in the design process should grounding features be specified for a custom rackmount enclosure?
Grounding features belong in the DFM review before drawings reach the fabrication floor. At that stage, paint-scrub zone locations, busbar mounting provisions, jumper attachment points and hardware callouts move into the manufacturing router and work instructions without extra fabrication cost. Specifying these features after finishing has begun usually requires rework, masking removal or post-build hardware additions that increase cost and schedule risk.
What resistance threshold should a custom rackmount enclosure meet for safety and EMI compliance?
The applicable threshold depends on the governing standard and the program requirements. Many data center and telecom programs specify tight limits at individual bond points. A conservative pass criterion satisfies most programs and provides margin against degradation over the product service life. The specific threshold appears in the grounding requirements document produced at the start of the program.
How does the choice between steel and aluminum affect the grounding approach?
Both materials support bonding and grounding through the enclosure body, but each introduces material-specific considerations. Steel enclosures accept standard zinc-plated bonding hardware at most joints. As noted in the fabrication steps, aluminum oxidation at bare-metal surfaces requires prompt hardware installation after masking removal to maintain conductivity at bonding zones. Mixed-metal hardware in aluminum assemblies accelerates galvanic corrosion at bond points, so stainless steel or aluminum-compatible fasteners are the appropriate choice for aluminum enclosures in environments with moisture or chemical exposure.
What are the most common reasons grounding fails at first-article inspection?
The three most common causes are incomplete drawings that omit bonding zone callouts, late design changes that relocate panels or hinges without a grounding impact review and hardware substitutions that introduce non-conductive coatings at bond points. A fourth cause, less common but significant, is the absence of continuity test criteria in the program documentation until the first-article stage, which means test point access and ground stud provisions were not included in the original design.
How does working with an integrated fabrication and assembly partner reduce grounding compliance risk?
An integrated partner manages fabrication, finishing and assembly under one roof, which removes the vendor handoff points where grounding features are often lost or misinterpreted. The same team that reviews the DFM drawings also controls the masking process, installs the busbar, routes the jumpers and performs the continuity test, so the grounding sequence follows a single set of work instructions and a single QMS. This structure reduces coordination overhead and provides a single point of accountability for first-article compliance.
Conclusion: Building Grounding into Every Custom Rackmount Program
Grounding in custom rackmount enclosures starts as a fabrication problem before it becomes an assembly problem. Paint-scrub zones, busbar mounting provisions and jumper attachment points must be specified during DFM review and built into the manufacturing router. Programs that treat grounding as a post-build task pay for it through rework, schedule delays and compliance failures. An integrated U.S. fabrication and assembly partner with engineering depth at the DFM stage provides a direct path to first-article success.